This is a simple project that you can do in an hour. Supplies needed:
Large frame (look at a thrift store)
Piece of sheet metal (Home Depot)
Tin snips
Spray paint (and spray primer if the frame is metal or you are changing to a drastically different color)
Magnets/Magnetic organizers (optional)
I wanted a magnet board for my office to hang my calendar and paper work I wanted off my desk. I went to good will and found a large picture for around $20 and I simply painted the frame and purchased a large piece of sheet metal at Home Depot (in the plumbing section - the sheet metal is about twice the size of the board you see here, so you can get two boards out of one piece! The metal was around $15). I used tin snips to cut it to the right size. I found a magnetic cup holder and file holder at Target to hold my pens and my papers)
I just made another one for my daughter's room to display her artwork and I also am going to hang some cute printable quotes on it. This is a fun and easy way to keep organized!
Showing posts with label Home Decor. Show all posts
Friday, February 8, 2013
Wednesday, February 6, 2013
Decorating with Maps
I love maps. Geography was always one of my favorite subjects. It is just so fun to learn about other places and cultures and dream of traveling there someday. Maps and globes are popping up all over the decorating world right now, so they are easy to find and a fun way to get your kids interested in learning more about the world! I thought it would be fun to use a map in our office decor, so we ordered a giant National Geographic map from amazon to place in our office. To make it look like a piece of art, we added some crown molding and created a frame around it on the wall.

Some fun places to find maps:
Mod Cloth
Free Map Collage
America Subway Art Map
And speaking of maps, we just purchased a fun leap frog puzzle map that my son loves. A fun way to get them learning more about the US and World.
We also have a couple maps on our collage wall in our family room. I printed a map of the United States and placed it in on a cork board so we can stick pins in the places we have visited.
Some fun places to find maps:
Mod Cloth
Free Map Collage
America Subway Art Map
And speaking of maps, we just purchased a fun leap frog puzzle map that my son loves. A fun way to get them learning more about the US and World.
Wednesday, January 30, 2013
No sew valance
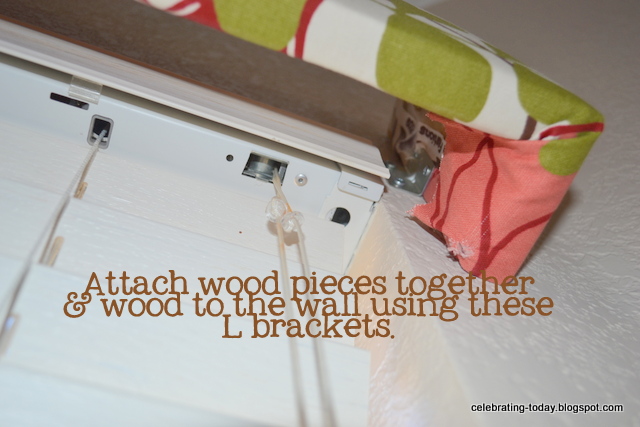
I wanted an easy valance idea for my bay window in my kitchen. I cut a piece of wood slightly longer than the width of my window and then cut two pieces a couple of inches long to connect to my the long piece. I connect them using an L bracket. I then wrapped the valance frame in batting. I glued it down, because I didn't have a staple gun at the time. If you have a staple gun, I would use that. I then took my fabric and did the same thing. Pulled it tight around the valance frame and glued (or staple). I then connected the valance to the wall with an L bracket. It is a two person process hanging them on the wall, but it goes fairly quickly. That's it! An easy no-sew box valance!
Friday, January 25, 2013
Family Room Decor Ideas
We have an awkward sized family room. It is long and narrow. It is too narrow to really fit the typical love seat perpendicular to the sofa. It is the room we use the most, so I made it my first priority when we moved into our home. I searched for a sectional that would fit the dimensions of our room and I found a reasonably priced line called Jonathan Louis that custom makes sectionals. Perfect!
BEFORE
AFTER
We then had our tv mounted on the wall and above our corner fireplace, since an entertainment center would work in front of a fireplace. It looks great and you can't see the wires, which I love.I found a side table at Goodwill. It is a bit scratch on top, as you can see, but it works. I may repaint it someday but it isn't a priority now. I found the lamp and lampshade at Target. I bought a basket at Home Goods to place our remotes, movies, magazines inside to keep clutter off the table. I also think having a plant in a room brightens the space.
For artwork, I decided to go with a California/Americana wall. I found a free old map of the Western US that I had printed at Costco. I also found some great California vintage artwork on art.com. I also added the preamble to the constitution that I designed in Photoshop. I had a page of connected dollar bills I purchased when I went to the mint. It is a fun wall collage I can keep adding too and switch up.
I found the rug at Lowes. I found a coral damsk fabric to make the throw pillows and a coral chevron to make my ottoman. I bought a solid piece of wood in the dimensions I wanted my ottoman (don't use particle board...I tried that at first and my son jumped on it and it broke in half!). I then attached 1x4s to make a base and screwed those into my large board. I bought wood legs at Lowe's and the hardware to attach them to the board. I then bought foam and batting at JoAnn's to wrap the ottoman and then covered with fabric and stapled with a staple gum (I tried using push brads at first, but staples work so much better and a gun is only about $12). I then wraped 1x4s with fabric and glued onto the sides of the ottoman. I may do a full post on this if I get time. Email me if you have questions.
I bought white curtains at Bed Bath and Beyond and then adhered coral fabric strips to the curtains and then covered the edges with a white ribbon. A no sew way to make custom curtains!
Wednesday, January 23, 2013
Family Photos Wall Collage Display
Labels:
Computer Projects,
Craft Projects,
Home Decor,
Photos
Saturday, January 19, 2013
Master Bedroom Accent Wall and Reveal
When we moved into our home I knew I wanted our master bedroom to have a different paint color and not just the color I had in the rest of the home (Behr's Haze which looks exactly like Kelly Moore's Snip of Tannin). I had such a hard time deciding that I ended up just going with a slightly darker color (Kelly Moore's Wise Owl) and then I decided to have an accent wall in a chocolate brown. After about a year I decided the chocolate brown made the room feel too dark and I wanted something more refreshing. I decided to paint the accent wall a light aqua color. I ended up going with Olymic's Geyser. I absolutely love it and am amazed at how a coat of paint can transform a room.
The trick with accent walls is to accent the wall that will be the focal point, which in a bedroom is the wall where the headboard will be. I've seen people accent walls in rooms that really shouldn't be the focal point and it just doesn't look right.

I also made other changes to our room (and still have a few more) but I thought I'd share what I've done so far.
First, I switched out the bedding. I love the quilt I made but it wasn't very masculine. My husband never complained but I thought I'd do something more neutral. I went with a white down-free comforter that I found at Marshall's. I found some aqua pillow cases at Ross to add a pop of color with all the white bedding. I also found a throw at Kohl's that matches perfectly.
I painted my lamps with white gloss spray paint and purchased new lamp shades. I painted my nightstands white using Annie Sloan paint and added new hardware. I also finally got a headboard! Our neighbor was going to throw their out so I snagged it and painted it.
I would love to make some valances over the windows and paint my large dresser eventually, but for now this works!
The trick with accent walls is to accent the wall that will be the focal point, which in a bedroom is the wall where the headboard will be. I've seen people accent walls in rooms that really shouldn't be the focal point and it just doesn't look right.
I also made other changes to our room (and still have a few more) but I thought I'd share what I've done so far.
First, I switched out the bedding. I love the quilt I made but it wasn't very masculine. My husband never complained but I thought I'd do something more neutral. I went with a white down-free comforter that I found at Marshall's. I found some aqua pillow cases at Ross to add a pop of color with all the white bedding. I also found a throw at Kohl's that matches perfectly.
I painted my lamps with white gloss spray paint and purchased new lamp shades. I painted my nightstands white using Annie Sloan paint and added new hardware. I also finally got a headboard! Our neighbor was going to throw their out so I snagged it and painted it.
I would love to make some valances over the windows and paint my large dresser eventually, but for now this works!
BEFORE
AFTER
Wednesday, January 16, 2013
Valentine's Day Fun!
I have been working on my 2012 Family Scrapbook and Family movie and my computer has been painfully slow and I realized I haven't wiped it clean in three years, so I think it is time. So that means I am finally making time to post since I am archiving all my old photos and removing them from my computer. I am going to schedule several posts so you should be seeing them every other day this month.
So let's start with Valentine's Day ideas! I am always sad to take down Christmas but having Valentine's Day a month and a half away makes it easier. I recently purchased this console table from Target. After having it in the house for about a month I decided that the dark cherry wood really isn't my style so I painted it white this weekend so it would be ready to display my Valentine's Day decor. I made a quick runner from a piece of burlap and then I found two picture frames I had lying around the house and did a search for Valentine's day printables and subway art and found these two cute free printables. I printed them off on cardstock and I added a mason jar with some hearts on sticks I picked up a couple years ago at the craft store and I had my display table!
I have a 16"x20" frame in my entryway that I switch up for each holiday. I found a free valentine's day subway art printable and had it printed at Costco. I don't have fresh flowers in my yard in February so I found some hearts to stick in my wall vases at the craft store last year.
I saw this adorable wreath on Our Best Bites and thought it was the perfect wreath for my front door. I bought 10 pieces of 9"x12" felt in red, white, and light pink and a foam 14" inch wreath. I cut each piece of fabric into fourths and then cut out the rosettes. You can click on the link to get the exact instructions. This project is time consuming. It took me about three hours and my right hand/wrist was sore for a few days after from rolling all those rosettes. However, I love the finished product and it was worth it!
Click here for other fun Valentine's Day ideas I've done in the past.
Thursday, November 8, 2012
How to Make a Thankful Tree
I know I've pretty much been on a blogging sabbatical for the past couple of years! Buying a fixer upper has created way too many projects for me; however, that does mean I have a lot of fun projects to blog about when I find the time. My goal is to start blogging once a week (probably Thursdays or Fridays).
I am a big fan of family traditions, especially for the holidays. My kids are young and I want to start traditions now that they can look forward to each year. Fall is a time I look forward to each year. Probably like you, our October was jam packed with costume parties, candy, pumpkin goodies, and trips to the pumpkin patch and apple orchard. I must say I breathed a huge sigh of relief when November 1st rolled around! Once Halloween passes it seems the anticipation of Christmas begins and we often don't give much thought to Thanksgiving (except for the food on the actual day). November is a nice month to kick back a bit before the craziness of December begins and reflect on our many blessings. To help my kids with this I thought it would be fun to create a Thankful Tree. I have seen this idea floating around the blogosphere and I thought it was the perfect November tradition for our family.
Creating a Thankful Tree is simple and makes a fun decoration or centerpiece. I went out to my backyard and snapped a few branches off one of my trees and placed them in a large Kerr Jar. I then cut circles out of scrapbook paper and hole punched them. You then can write what you are thankful for on the back of each circle tag and place on a branch. You can do one circle per person each day or you could wait until the day of Thanksgiving and have each person at your dinner write what they are thankful for and place the tag on the tree.
Happy November!
Friday, November 4, 2011
Make a photo collage of school art projects
My son makes at least one art project at school everyday and so we decided to come up with a way to display them. I ended up just stringing some twine on an empty wall in his room.

He has made a lot of projects since September and his display area was full, so we took all the projects down and took pictures of them and then I created a collage in Picasa. See how to do that here. In January, when I make our 2011 scrapbook, I'll insert the collage picture, so we can always remember his fun art projects on one page instead of 36 pages.
Labels:
Children,
Computer Projects,
Home Decor,
Organization
Saturday, October 8, 2011
Master Bath Remodel
What we did: Purchased new, taller vanity and painted white, new counter top, added new light fixtures and mirrors, added brushed nickel faucets, knobs, and handles.
What we did: Replaced carpet with tile, angled the new bath tub, replaced large window with a smaller one. Still need to get new rugs and add some color with artwork and towels.
What we did: Repainted and added knobs.
What we did: New flooring and toilet.While we were in escrow, a pest inspector found dry rot in both bathrooms. So, on top of our already long list of things to fix-up with the home we got to add renovating two bathrooms. Yipee! We are first time home buyers and we had no idea what we were getting ourselves when we decided to redo the two bathrooms. The main bath was straightforward, but the master was quite the project due to the fact that not only was the rot in the shower but also in the wood work around the bathtub. The tile on the counter top was also falling off and very dated, so we decided to get a taller vanity (since we were replacing the top anyway) and countertop. It turned into one massive project.
After looking at all kinds of bathroom design ideas, we ended up sticking with a very neutral color. We purchased 18" porcelain tile for the floor and the same 12" porcelain tile for the tub and shower. For an accent, we went with a glass tile and we did 2" travertine for the shower floor. Our shower before was super small and just barely could fit a person, so we wanted a larger one. However, that wasn't possible since there was a massive window in the bathroom. So we decided to purchase a smaller window to create a larger shower. We also turned the tub on an angle to create more space and built a step up to the tub to make it easier to get in and out. Overall, I am happy with the tile. I did learn that the small glass tiles don't come perfectly straight on their sheets and that bothered me, but I have gotten used to it and don't notice as much anymore.
We purchased an unfinished vanity that we had painted white along with the rest of the cabinets in the home. We also used the same knobs and handles in brushed nickle that we used throughout the home.
One of the biggest challenges for me was picking out a countertop. My dilema was that I really don't like the look of granite (unless it is a solid color, like the black did in my kitchen, but I didn't want black in my bathroom). I like solid colors. I really love quartz products, but they weren't in the budget. I found some travertine and marble I liked, but I found in the research that I did that they are higher maintenance and I think harder to keep sanitary since you can't use many types of cleaners on them. So....I looked into solid surfaces. I wasn't sure how I felt about acrylic. I thought it may look cheap or cheesy. However, I found someone who was willing to come to my house and bring samples. I liked the product and he had a competitive price, so I decided to go for it. I asked for an extra thick, solid white countertop with seamless sinks. We used a product made by Samsung called Staron. The end result? I am in love! It does not look cheap or cheesy, but very sleek and sophisticated. I am so happy we went with acyrilic. It is easy to clean and maintain and looks great.
As for fixtures, I found them at Lowes. I went with Price Pfister line on everything but the roman tub faucet (they did not have one in that model) so I found a very similar one made by Glacier Bay. I also found my two white mirrors at Lowe's. I found the two light fixtures on Amazon.
There still are a couple of things left to do. I still haven't purchased a shower door. I'll post pictures of the shower when the door is installed. I also am eventually going to buy new rugs and wall decor. But it is functioning and we are really enjoying our bathroom. I am just thankful we no longer have carpet in the bathroom!
Monday, October 3, 2011
Decorating My Entryway
I also knew I wanted a bench in the entryway. I decided on white, since I have used painted white wood throughout the house so I felt it tied in with the style in the home. I found the bench on Overstock. I found the basket to hold the shoes at Home Goods and I just added a piece of felt to the bottom so it didn't scratch my wood floor.
I made the pillow covers using the steps from this earlier post. I found the lime fabric at JoAnn and the floral pattern online called Paradise Ivory Double Blooms. I found free subway art at this site. I am going to swap the art with each holiday and between I will have the quote that is now in the frame. I had it printed as a 16"x20" photo at Costco for around $6. I found the white frame at Aaron Brothers.
I made the hanging mason jar vases by purchasing a small piece of pine at Lowe's and sawing it in half so I had two boards. I painted the boards with two coats of white paint. I bought two hose clamps and my hubby drilled a hole though the clamp at secured onto the board. I then added a picture hanger on the back of each board and secured the jars into the clamps and hung on the wall. Super easy. I now just have to make sure I have at least some kind of flower blooming all year to keep the jars full.
Saturday, August 20, 2011
Laundry Room Reveal

Our laundry room was in need of some freshening up when we purchased the house. The flooring was pretty trashed and the cabinets were dated. We just did a few things in that room that really made it look more modern and fresh.
-Painted the cabinets in Kelly Moore's Swiss Coffee using Behr paint
-Added brushed nickle knobs to the cabinets
-Painted the walls using the color Haze by Behr
-New tile flooring from Lowe's
-Added shelving below the cabinets. Shelving and bins from IKEA.
-Added a picture to the room with a quote that I love about laundry...."As I do more laundry, nudists seem less crazy." Ha ha. Laundry does seem to be never ending.
Tuesday, May 31, 2011
Kitchen remodel
We've been busy updating the home we recently bought the past couple months. We still have a lot to do, but it is coming along nicely. Below are some before and after pictures of our kitchen and breakfast nook. I absolutely love my black and white kitchen. I went back and forth on whether to do white counters or black. I really love white marble counters, but they are so porous and chip so easily that they weren't practical and Caesarstone was out of the budget so we went with beautiful black pearl granite and I am really happy with it. It is a happy room and I love cooking in it.


For those interested (I really appreciated blogs that told me where they bought everything) here is what we did:
-White cabinet paint is called Kelly Moore Swiss Coffee (using color match w/Behr paint)
-Brushed nickle knobs and pulls from Lowe's (sold in bulk pack)
-Franke black granite composite sink from Lowe's
-Kohler Simplice Stainless steel faucet from HD
-Hickory Flooring (yes, i went with the Hickory over the bamboo because it has a matte finish and is already distressed, so any dings the kiddies give it will blend in better) from Simple Floors
-Whirlpool clean steel fridge and GE cleansteel dishwasher (no fingerprints!) from Lowe's
-Whirlpool stainless steel stove with five burners (love it!) from Lowe's
-Wall paint: Haze by Behr (sold at HD)
-New pantry cabinet (we bought unfinished at Lowe's)
-Granite is called Black Pearl (We extended the counter tops so we can have bar stools)
-New window (middle one in bay)
I love my kitchen and am so happy how it turned out. I still have a list of decor projects, but the bulk of the work is done in there. More rooms to come as I finish more projects.


For those interested (I really appreciated blogs that told me where they bought everything) here is what we did:
-White cabinet paint is called Kelly Moore Swiss Coffee (using color match w/Behr paint)
-Brushed nickle knobs and pulls from Lowe's (sold in bulk pack)
-Franke black granite composite sink from Lowe's
-Kohler Simplice Stainless steel faucet from HD
-Hickory Flooring (yes, i went with the Hickory over the bamboo because it has a matte finish and is already distressed, so any dings the kiddies give it will blend in better) from Simple Floors
-Whirlpool clean steel fridge and GE cleansteel dishwasher (no fingerprints!) from Lowe's
-Whirlpool stainless steel stove with five burners (love it!) from Lowe's
-Wall paint: Haze by Behr (sold at HD)
-New pantry cabinet (we bought unfinished at Lowe's)
-Granite is called Black Pearl (We extended the counter tops so we can have bar stools)
-New window (middle one in bay)
I love my kitchen and am so happy how it turned out. I still have a list of decor projects, but the bulk of the work is done in there. More rooms to come as I finish more projects.
Wednesday, May 11, 2011
Bathroom Remodel
Yes, I am still alive! These past two months have been extremely busy and stressful as we remodeled the home we just purchased. We have moved in and everything is basically done except for our master bath. I am still deciding which direction to go in that room, but I am really loving the vintage turn-of-the century look with white subway tiles and a hex tile floor. Isn't it beautiful? It seems to be all the rage right now...it seems like all blogs with bathroom remodel tutorials have gone with the vintage look with their own twist. I think it is beautiful and would love a bathroom like this first photo.

I also think this tile that looks like a wood floor is so cool. I never knew this existed!
Once life gets back to normal, I'll have lots of fun design posts to share.

I also think this tile that looks like a wood floor is so cool. I never knew this existed!

Once life gets back to normal, I'll have lots of fun design posts to share.
Tuesday, March 29, 2011
Subscribe to:
Posts (Atom)