

Monday, August 21, 2017
New Web page
Visit me over at my new site at celebratingtheday.com! I'm blogging regularly again. Come on over and join the fun!

Wednesday, November 23, 2016
My Favorite Usborne Books
I am hosting an online Usborne book party this Tuesday, so I thought I would share some of my favorite books to help those of you unfamiliar with the books know some good ones to order. I am sure your kids will loves these as much as mine do! These make great Christmas gifts for your kids, grandkids, cousins, etc. When you order on Tuesday (or day or two after) just make sure to select my name at check-out.
Baby and Toddler Books:
Animal Hide and Seek


That's Not My Series - A personal favorite of my son is That's Not My Plane (Also have them for Snowman, Pirate, Mermaid, Fairy, etc).

Nursery Rhymes (I couldn't find the exact one I have, but this one looks similar)

Children's book:
A Squirrel's Tale - This has been well-loved at our home! Kids love sliding the squirrel in and out of the slots on each of the pages trying to help squirrel find his acorns.

Telling Time - I couldn't find this on there site so it may be sold out or no longer sold. I'll check on that.
Busy Car Book - We have the car version of this and it comes with an actual car that drives around the page of the book. The helicopter one also looks fun.

See Inside Your Body Book

I Can Draw Animals - my daughter loves this

Others I am eyeing that I've heard great things about (I didn't put a picture of all of them, but listed some that I've heard great things about):
Plane Lift and Look, Book of Bible Stories,

Muddle and Match,

Illustrated Stories of Greek Myths (also have Aesops Fables, Fairy Tales, and other Illustrated Stories),

Science Encyclopedia (tons of other fun encyclopedia books based on your child's interests),

The Children's Book of Art, Very First Reading Set, Lift and Look Trains, Step by Step Drawing Book, Secrets of the Seashore (there are a series of these shine-a-light book where you can see all the hidden things when you shine a flashlight on the page),

Busy Helicopter Book, 1000 Things that Go (a book just of pictures and names of the picture...my 2 year old would love looking at this...all kinds of other books in this series such as animals, sea, eat),

Slide and See Series,

Animally (I really am wanting to get this one...great going to bed book),

Big Book of Colors, Ted and Friends, Cow Takes a Bow (great learning to read book...they have lots of good phonics books, too),

I love you Americanly,

My Very First Book of Things to Spot, Count to 100, Illustrated Alphabet, There's a Mouse About the House, Nibbles, Busy Bug Book

Interested in some of the top books? Check out these quick Youtube videos:
Top books
Non-fiction books
Baby and Toddler Books:
Animal Hide and Seek

My Wild Animal World - 9 tiny books perfect for a toddler's hands.


Nursery Rhymes (I couldn't find the exact one I have, but this one looks similar)

Children's book:
A Squirrel's Tale - This has been well-loved at our home! Kids love sliding the squirrel in and out of the slots on each of the pages trying to help squirrel find his acorns.

Telling Time - I couldn't find this on there site so it may be sold out or no longer sold. I'll check on that.
Busy Car Book - We have the car version of this and it comes with an actual car that drives around the page of the book. The helicopter one also looks fun.

See Inside Your Body Book

I Can Draw Animals - my daughter loves this
Others I am eyeing that I've heard great things about (I didn't put a picture of all of them, but listed some that I've heard great things about):
Plane Lift and Look, Book of Bible Stories,


Illustrated Stories of Greek Myths (also have Aesops Fables, Fairy Tales, and other Illustrated Stories),

Science Encyclopedia (tons of other fun encyclopedia books based on your child's interests),

The Children's Book of Art, Very First Reading Set, Lift and Look Trains, Step by Step Drawing Book, Secrets of the Seashore (there are a series of these shine-a-light book where you can see all the hidden things when you shine a flashlight on the page),

Busy Helicopter Book, 1000 Things that Go (a book just of pictures and names of the picture...my 2 year old would love looking at this...all kinds of other books in this series such as animals, sea, eat),

Slide and See Series,

Animally (I really am wanting to get this one...great going to bed book),

Big Book of Colors, Ted and Friends, Cow Takes a Bow (great learning to read book...they have lots of good phonics books, too),

I love you Americanly,

My Very First Book of Things to Spot, Count to 100, Illustrated Alphabet, There's a Mouse About the House, Nibbles, Busy Bug Book

Interested in some of the top books? Check out these quick Youtube videos:
Top books
Non-fiction books
Wednesday, April 22, 2015
Teaching Kids About Pornography
With all of the media and technology at our kids' fingertips, it is important to teach them at a young age what pornography is and what to do when they see it. I've read statistics that the average exposure to pornography is age eight!


I ordered a great book that helps teach kids about "good pictures" and "bad pictures." It is called Good Pictures Bad Pictures: Porn-Proofing Today's Young Kids by Kristen A. Jenson. It made it really easy for my young kids to understand what pornography is and also why it is addictive (she talks about how the brain has a feeling part and a thinking part). It also helps kids understand what to do when they see pornography.
Another good book I recently checked our from the library, is I Said No! A kids-to-kid guide to keeping private parts private by Zac and Kimberly King. It is a great way to talk about another sensitive subject with young kids. It helps kids understand boundaries and recognize dangerous situations.
These books are both great ways to open a conversation about awkward subjects that we don't always know how to go about as parents.
Wednesday, November 12, 2014
Create your own recipe book

I have been looking for a way to condense my recipe books. I have three binders and they are a bit overwhelming and most of the recipes I never use. So, I decided to go through my binders and select the recipes I really wanted to keep and publish them in a recipe book. I looked at a variety of companies to publish my book, but only one had all the criteria I wanted.
.JPG)
.JPG)
My criteria:
1. The book had to be a binder type style, so I could continue to add recipes to it.
1. The book had to be a binder type style, so I could continue to add recipes to it.
2. I wanted the book to be in color and to have photos.
I could customize this book more on on photobook site such as Blurb, but they didn't offer binder options and being able to add more recipes was more important to me than customizing the page.
I ended up finding a company called Tastebook that fit my criteria. I am really happy with my book. I love that I have a photo of my grandmother right next to her peach pie recipe. It is wonderful having photos to go along with family recipes and to remember that person as you are cooking or baking. Also, I can now toss all three of my recipe binders and all my favorite recipes are in one book! During the holiday season they are also offering 10% off their books. This would be a great Christmas gift. You could put all your family recipes in a book and give to grandmas, parents, siblings, etc.
You could do the same thing if you wanted to print your recipes off with a picture on them on your computer and put in a binder with a page protector. See this post here, but I liked the idea of having something a little more professional.
.JPG)
.JPG)
Thursday, December 26, 2013
New Year's Eve Party Ideas with Kids
I love New Year's Eve. It is a stress-free holiday and it is lots of fun. We always celebrate at 9 p.m. with the East Coast. We start the evening with some good food. I love doing a bunch of appetizers on New Year's Eve.
I also decorate our Christmas tree as a New Year's Tree. I take down all the ornaments and add party hats, noise makers, balloons, etc. I have three balloons with a piece of paper inside with an activity for the kids to do. This past year one was put together a puzzle, another was to paint, and another was to play a candy bar game (kind of like a white elephant).

 We then always love to light a few fireworks and then come inside and do the countdown and toast with Martinelli's cider.
I also decorate our Christmas tree as a New Year's Tree. I take down all the ornaments and add party hats, noise makers, balloons, etc. I have three balloons with a piece of paper inside with an activity for the kids to do. This past year one was put together a puzzle, another was to paint, and another was to play a candy bar game (kind of like a white elephant).


Sunday, December 1, 2013
Lemon Curd
Lemon curd is one of my favorite things to make with the lemons from our tree. I have searched high and low for the best recipe and this is one I made up from a combination of recipes I tried.
3 lemons
1 1/3 cup sugar
1 stick butter
5 egg yolks
1/2 cup lemon juice
1/8 tsp kosher salt
Zest the lemons and mix with the sugar in a large bowl. Cream the butter and beat in the sugar and lemon mixture. Add the eggs, 1 at a time, and then add the lemon juice and salt. Mix until combined. Pour the mixture into a saucepan and cook over low heat until thickened (about 15 minutes), stirring constantly. The lemon curd will thicken just below simmer. Remove from the heat and cool or refrigerate.
Friday, November 22, 2013
Christmas Traditions
My son loved this Christmas Nativity Advent. I printed it off and laminated it and then cut out the pieces.
 I actually had a piece inside this advent each day that he could pick and then some days their was also another fun activity we could do, such as go see the lights, make cookies, Christmas movie night, etc.

Another fun tradition I started was wrapping a shoe box with a brown paper sack as a bed for baby Jesus and then the kids can add a piece of straw to His bed every time they do a good deed. I do this the last week before Christmas. We want to make sure we have a nice soft bed for Him and it gets them thinking about the real reason for the season.


Another fun tradition I started was wrapping a shoe box with a brown paper sack as a bed for baby Jesus and then the kids can add a piece of straw to His bed every time they do a good deed. I do this the last week before Christmas. We want to make sure we have a nice soft bed for Him and it gets them thinking about the real reason for the season.

Thursday, September 19, 2013
Great Design Site and App
It has been way too long since I've posted! I thought I'd post of two of my favorite finds this week.
For all you digital crafters, check out Persnickity Prints digital freebies. I'm in love with their super cute kits and can't believe they are free!

My new favorite app for the iPhone, is the photo editing app from Rhonna Designs. Check out the video tutorials here. It is a fun way to add embellishments and edit your photos. Below is a quick example of some things you can do with your photos.
.JPG)
Wednesday, March 13, 2013
New Look
It's been awhile since my blog has had a facelift, so bear with me as I work on getting all the links working. Hopefully the site will be easier to navigate and look a bit prettier, too!
Saturday, February 16, 2013
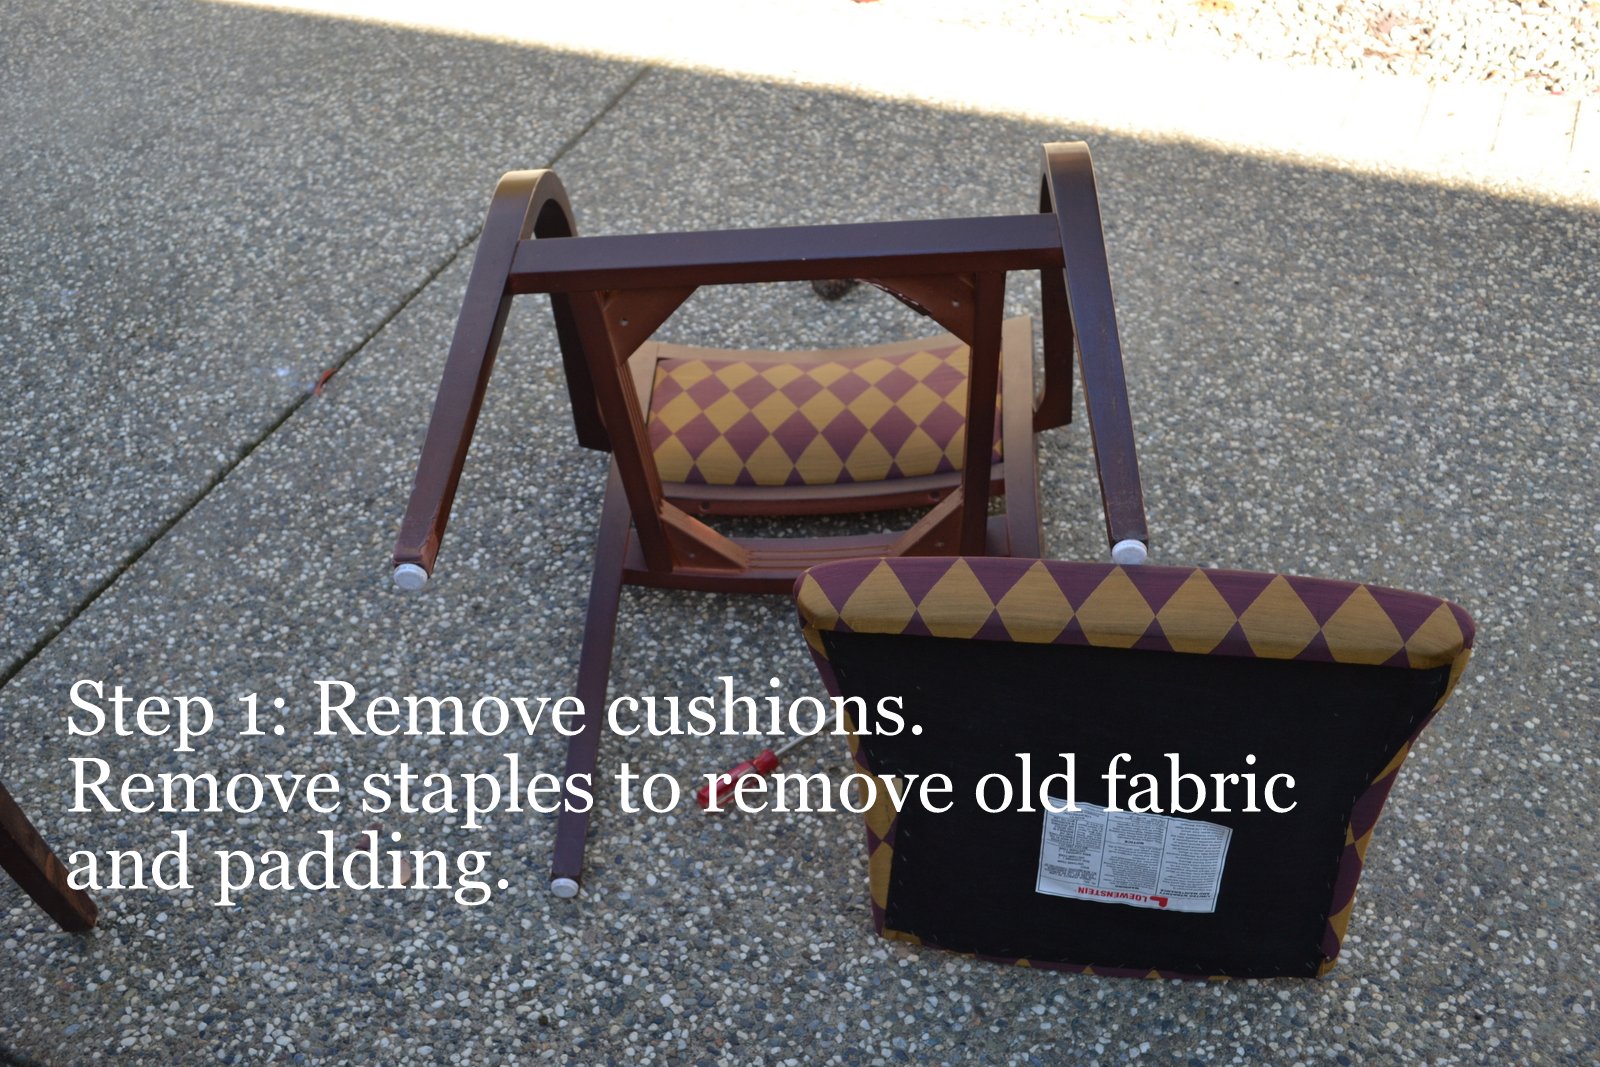
How to Refinsh and Reupholster a Dining or Accent Chair

I've been on the hunt for two accent chairs to go in our living room that I am in the process of furnishing. I've been looking every free minute I've had the past two weeks hoping to find a new one in my price range so I didn't have to create another project for myself. However, I had no luck and I was tired of looking. So, last week I found these two chairs for $15 each at a local thrift shop and decided these were going to have to work as my new accent chairs.

To begin my transformation, I unscrewed the cushions and began the tedious process of pulling out all of the staples to remove the fabric and padding. I quickly tired of this process and ended up just cutting the fabric with a razor just before the staples, so I didn't have to pull out the hundreds of staples that were used to attach the fabric. Big time saver. Make sure to keep the old fabric and padding to use as a pattern for your new fabric.
Next, I used my sander and roughed up the surface. I then sprayed the chairs with Valspar's glossy white paint/primer in one. These two chairs took three bottles. I let the chairs dry overnight and then I applied a wax to protect the paint. I used Annie Sloan clear wax. I've also used Johnson and Johnson's on furniture in the past and it also works well.

Next, I used my old fabric and padding as a pattern to cut out my new fabric and padding. The fabric I used is actually from a table cloth that I found at Target for $10. I purchased the padding at Joann's for around $8 (using a 40% off coupon).


I stapled the padding down first using my staple gun. Then I attached the fabric. I covered the underside with burlap at the end (forgot to get a picture of that) just to make it look more finished. Make sure to pull tightly to eliminate wrinkles.
Next, I screwed the cushions and backing into the chairs. I had a few stray strings of fabric on the back cushions that I just tucked back in using a butter knife.

This is a time consuming project, but is an inexpensive way to create a gorgeous accent chair. I was able to get two accent chairs $60 and a few hours of work.


Friday, February 8, 2013
Make your own magnet board
This is a simple project that you can do in an hour. Supplies needed:
Large frame (look at a thrift store)
Piece of sheet metal (Home Depot)
Tin snips
Spray paint (and spray primer if the frame is metal or you are changing to a drastically different color)
Magnets/Magnetic organizers (optional)
I wanted a magnet board for my office to hang my calendar and paper work I wanted off my desk. I went to good will and found a large picture for around $20 and I simply painted the frame and purchased a large piece of sheet metal at Home Depot (in the plumbing section - the sheet metal is about twice the size of the board you see here, so you can get two boards out of one piece! The metal was around $15). I used tin snips to cut it to the right size. I found a magnetic cup holder and file holder at Target to hold my pens and my papers)

I just made another one for my daughter's room to display her artwork and I also am going to hang some cute printable quotes on it. This is a fun and easy way to keep organized!
Wednesday, February 6, 2013
Decorating with Maps
I love maps. Geography was always one of my favorite subjects. It is just so fun to learn about other places and cultures and dream of traveling there someday. Maps and globes are popping up all over the decorating world right now, so they are easy to find and a fun way to get your kids interested in learning more about the world! I thought it would be fun to use a map in our office decor, so we ordered a giant National Geographic map from amazon to place in our office. To make it look like a piece of art, we added some crown molding and created a frame around it on the wall.


Some fun places to find maps:
Mod Cloth
Free Map Collage
America Subway Art Map
And speaking of maps, we just purchased a fun leap frog puzzle map that my son loves. A fun way to get them learning more about the US and World.


We also have a couple maps on our collage wall in our family room. I printed a map of the United States and placed it in on a cork board so we can stick pins in the places we have visited.

Some fun places to find maps:
Mod Cloth
Free Map Collage
America Subway Art Map
And speaking of maps, we just purchased a fun leap frog puzzle map that my son loves. A fun way to get them learning more about the US and World.
Monday, February 4, 2013
Using shoe organizers to keep organized
I have a couple shoe organizers in my home. One I hang in my coat closet and I put all of our gloves, hats, and umbrellas in the pouches. The other I hang on the back of my office door and I use it to organize my kids craft supplies and other office supplies. It is easier for me to keep organized this way rather than digging through a drawer searching for what I want since each supply has it's own pocket.
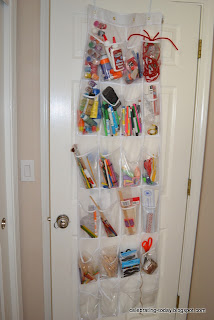
P.S. I just noticed my kids had rearranged some of the items, so not everything is in its proper place, but you get the idea. :)

P.S. I just noticed my kids had rearranged some of the items, so not everything is in its proper place, but you get the idea. :)
Friday, February 1, 2013
Minnie Mouse Party
My daughter loves Minnie Mouse, so we had a small party with my parents on her birthday to celebrate. My mom is an excellent cake decorator, so she helped me out. She had this Mickey Mouse cake pan where he is wearing a party hat. To make it look like Minnie, we cut off his party hat and made it look like a bow and then we just looked at a picture of Minnie Mouse when we frosted it. You could also always piece the cake together by backing two 9x12 cakes and cutting out with a pattern you draw or find online. We also did pink and white cupcakes.

Frosting Recipe:
4 cups powdered sugar
1 cup softened butter
1 tsp vanilla

We made a cute birthday banner using sparkly pink and black paper and placing stickers on each pennant, spelling out "Happy Birthday." We punched holes in the pennants and strung with Minnie Mouse ribbon. In between the pennants we placed pictures of my daughter and hung with small cloths pins.
Wednesday, January 30, 2013
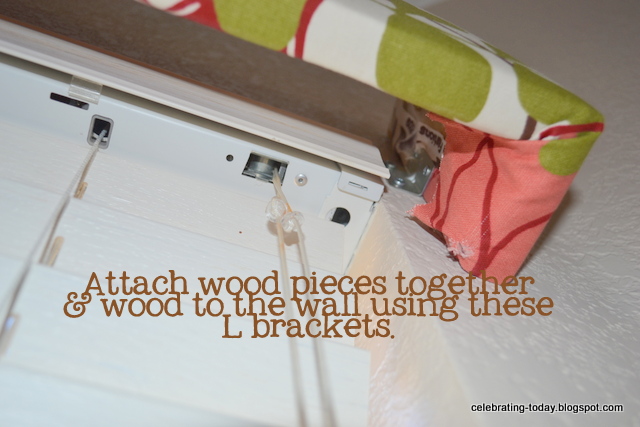
No sew valance

I wanted an easy valance idea for my bay window in my kitchen. I cut a piece of wood slightly longer than the width of my window and then cut two pieces a couple of inches long to connect to my the long piece. I connect them using an L bracket. I then wrapped the valance frame in batting. I glued it down, because I didn't have a staple gun at the time. If you have a staple gun, I would use that. I then took my fabric and did the same thing. Pulled it tight around the valance frame and glued (or staple). I then connected the valance to the wall with an L bracket. It is a two person process hanging them on the wall, but it goes fairly quickly. That's it! An easy no-sew box valance!

Subscribe to:
Posts (Atom)