My son loved this Christmas Nativity Advent. I printed it off and laminated it and then cut out the pieces.
I actually had a piece inside this advent each day that he could pick and then some days their was also another fun activity we could do, such as go see the lights, make cookies, Christmas movie night, etc.
Another fun tradition I started was wrapping a shoe box with a brown paper sack as a bed for baby Jesus and then the kids can add a piece of straw to His bed every time they do a good deed. I do this the last week before Christmas. We want to make sure we have a nice soft bed for Him and it gets them thinking about the real reason for the season.
Showing posts with label Children. Show all posts
Friday, November 22, 2013
Friday, February 1, 2013
Minnie Mouse Party
My daughter loves Minnie Mouse, so we had a small party with my parents on her birthday to celebrate. My mom is an excellent cake decorator, so she helped me out. She had this Mickey Mouse cake pan where he is wearing a party hat. To make it look like Minnie, we cut off his party hat and made it look like a bow and then we just looked at a picture of Minnie Mouse when we frosted it. You could also always piece the cake together by backing two 9x12 cakes and cutting out with a pattern you draw or find online. We also did pink and white cupcakes.
Frosting Recipe:
4 cups powdered sugar
1 cup softened butter
1 tsp vanilla
We made a cute birthday banner using sparkly pink and black paper and placing stickers on each pennant, spelling out "Happy Birthday." We punched holes in the pennants and strung with Minnie Mouse ribbon. In between the pennants we placed pictures of my daughter and hung with small cloths pins.
Frosting Recipe:
4 cups powdered sugar
1 cup softened butter
1 tsp vanilla
We made a cute birthday banner using sparkly pink and black paper and placing stickers on each pennant, spelling out "Happy Birthday." We punched holes in the pennants and strung with Minnie Mouse ribbon. In between the pennants we placed pictures of my daughter and hung with small cloths pins.
Thursday, November 8, 2012
How to Make a Thankful Tree
I know I've pretty much been on a blogging sabbatical for the past couple of years! Buying a fixer upper has created way too many projects for me; however, that does mean I have a lot of fun projects to blog about when I find the time. My goal is to start blogging once a week (probably Thursdays or Fridays).
I am a big fan of family traditions, especially for the holidays. My kids are young and I want to start traditions now that they can look forward to each year. Fall is a time I look forward to each year. Probably like you, our October was jam packed with costume parties, candy, pumpkin goodies, and trips to the pumpkin patch and apple orchard. I must say I breathed a huge sigh of relief when November 1st rolled around! Once Halloween passes it seems the anticipation of Christmas begins and we often don't give much thought to Thanksgiving (except for the food on the actual day). November is a nice month to kick back a bit before the craziness of December begins and reflect on our many blessings. To help my kids with this I thought it would be fun to create a Thankful Tree. I have seen this idea floating around the blogosphere and I thought it was the perfect November tradition for our family.
Creating a Thankful Tree is simple and makes a fun decoration or centerpiece. I went out to my backyard and snapped a few branches off one of my trees and placed them in a large Kerr Jar. I then cut circles out of scrapbook paper and hole punched them. You then can write what you are thankful for on the back of each circle tag and place on a branch. You can do one circle per person each day or you could wait until the day of Thanksgiving and have each person at your dinner write what they are thankful for and place the tag on the tree.
Happy November!
Friday, November 4, 2011
Make a photo collage of school art projects
My son makes at least one art project at school everyday and so we decided to come up with a way to display them. I ended up just stringing some twine on an empty wall in his room.

He has made a lot of projects since September and his display area was full, so we took all the projects down and took pictures of them and then I created a collage in Picasa. See how to do that here. In January, when I make our 2011 scrapbook, I'll insert the collage picture, so we can always remember his fun art projects on one page instead of 36 pages.
Labels:
Children,
Computer Projects,
Home Decor,
Organization
Wednesday, August 17, 2011
Busy Bags
My friend had the wonderful idea recently of having a busy bag swap. A busy bag is an activity for young children that teaches them a skill as well as keeps them busy whenever you may need them to be. Whether it is at church, on a car ride, or just at home. Rather than have them watch yet another tv show, you can give them a great learning activity instead.
We had a group of 14 women. We each made 14 of the same busy bag activity and then we got together and swapped them. So we each came home with 14 different activities for our children. My son has tried several of them already and loves them. I am hoping we will do another one soon since they were such a hit.
Here are some links with ideas for busy bags.
Button Snake (this is what I did for my bag)
List of ideas here, here, or here.
Tuesday, August 16, 2011
Race Car Birthday Party
My son wanted a race car birthday party this year. I had to put it together quickly, since my husband was going to be out of town when I was planning the party so I just had a couple of days to plan since there was no way my son was going to have the party AFTER his birthday without driving me insane asking about the party every five minutes.
I found tons of great ideas on this site here. We ended up keeping it simple. I had a breakfast party and I made the cake out of a stack of donuts that looked like race car tires served with fruit, bacon, and juice. The kids painted their own wood race cars and played pin the car on the race track. I planned on setting the table up like a race track and using these adorable road cones for cups, but since the party was earlier than planned they weren't delivered in time.

For his birthday cake that night, he had a race car cake. He loved it! It was super simple, too.
Race Car Track Cake:
Supplies Needed:
-One package OREO cookies
-One cake mix
-Frosting (see below)
-Coconut
-Green food coloring
-Car for top of cake
-Toothpicks
-Construction paper
Frosting:
2 cups powdered sugar
1/2 cup softened butter
1/2 tsp vanilla
I made one cake mix and then baked in two round cake pans. I cut the top of the cake off to make flat and flipped cakes over onto a piece of cardboard I covered with aluminum foil. I frosted the cake. I untwisted all of the Oreo cookies and the side without the cream I put in the food processor and crushed into a fine powder. I then poured it around the perimeter of the cake to look like the road. I then placed the Oreos with cream around the side of the cake to look like tires. I then dyed the coconut green and placed in the center of the cake to look like grass. I then took a spoonful of frosting and put it in a bag and piped it in lines to look like the dashed lines of the road.
Next, I cut out three triangles out of construction paper and taped to a toothpick and placed them by the road. I then found a checkered image online and put my son's name over it and printed it out to look like a race banner. I put a toothpick on each side of the banner to hold it up.
I found tons of great ideas on this site here. We ended up keeping it simple. I had a breakfast party and I made the cake out of a stack of donuts that looked like race car tires served with fruit, bacon, and juice. The kids painted their own wood race cars and played pin the car on the race track. I planned on setting the table up like a race track and using these adorable road cones for cups, but since the party was earlier than planned they weren't delivered in time.

For his birthday cake that night, he had a race car cake. He loved it! It was super simple, too.
Race Car Track Cake:
Supplies Needed:
-One package OREO cookies
-One cake mix
-Frosting (see below)
-Coconut
-Green food coloring
-Car for top of cake
-Toothpicks
-Construction paper
Frosting:
2 cups powdered sugar
1/2 cup softened butter
1/2 tsp vanilla
I made one cake mix and then baked in two round cake pans. I cut the top of the cake off to make flat and flipped cakes over onto a piece of cardboard I covered with aluminum foil. I frosted the cake. I untwisted all of the Oreo cookies and the side without the cream I put in the food processor and crushed into a fine powder. I then poured it around the perimeter of the cake to look like the road. I then placed the Oreos with cream around the side of the cake to look like tires. I then dyed the coconut green and placed in the center of the cake to look like grass. I then took a spoonful of frosting and put it in a bag and piped it in lines to look like the dashed lines of the road.
Next, I cut out three triangles out of construction paper and taped to a toothpick and placed them by the road. I then found a checkered image online and put my son's name over it and printed it out to look like a race banner. I put a toothpick on each side of the banner to hold it up.
Sunday, June 19, 2011
Ladybug Birthday Party
We had a ladybug birthday party for my daughter this past weekend. I was terrible at taking pictures, so I don't have as many as I would have liked to but I thought I'd pass along some of the ideas.
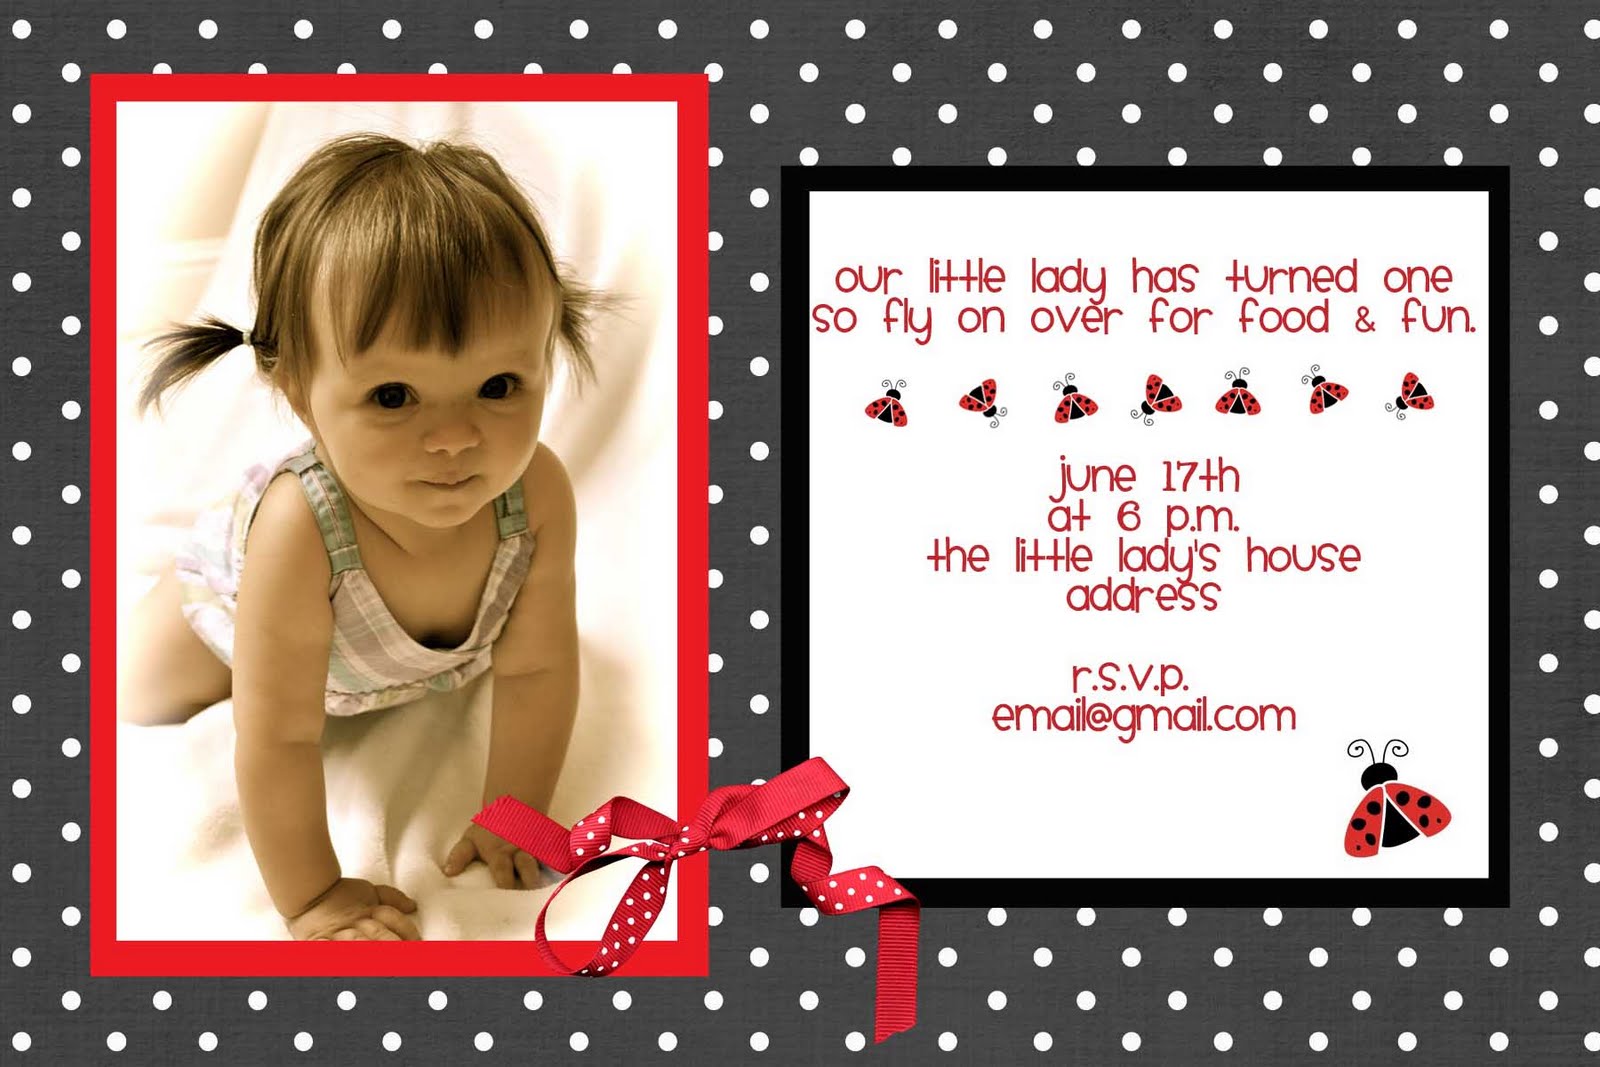
The Invite:
Below is the invitation to her party. I just found a fun lady bug image I liked online and a fun black and white poka dot image online as well. I created the invite in Photoshop Elements and had the invites printed at Wal-Mart as 4"x6" photos.
Display:
We were going to have the party outside on our patio but we had been finishing up planting a flower bed in time for the party and didn't even think about the smell that comes with fresh dirt. Our back yard basically smelled like a barnyard so we moved the party inside. I had a picture of the bday girl in a black frame and a vase of red flowers to go along with the red and black lady bug theme. I had red plates and cups and black utensils and napkins. I had a red and black balloon. I made a banner using black yarn and small clothes pins with pictures of her each month of her first year. The birthday girl was also wearing a cute little lady bug shirt. I had a lady bug costume, but she wasn't feeling well that day so I didn't want to put her in anything uncomfortable.

The Food:
I served these adorable ladybug cracker appetizers. I made this delicious Southwest pasta salad and had some bread to go along with it. I had a tray of strawberries with a dip which is made out of a 8 ounce container of strawberry cream cheese and 8 oz of marshmallow cream. For dessert we had cupcakes. I used a yellow cake mix and added zest from one lemon to it and then I frosted it with this lemon frosting. I made lady bug toppers to put on top using the same lady bug image I used on my invites. I printed twelve of the images to a page and printed them and cut them out in a circle shape. I then cut red card stock in a slightly larger circle and glued the ladybug cutout to the red piece. I then taped a toothpick to the back and stuck in the cupcake. They turned out really cute and were delicious. We served with some delicious Breyer's vanilla ice cream.
The Invite:
Below is the invitation to her party. I just found a fun lady bug image I liked online and a fun black and white poka dot image online as well. I created the invite in Photoshop Elements and had the invites printed at Wal-Mart as 4"x6" photos.
Display:We were going to have the party outside on our patio but we had been finishing up planting a flower bed in time for the party and didn't even think about the smell that comes with fresh dirt. Our back yard basically smelled like a barnyard so we moved the party inside. I had a picture of the bday girl in a black frame and a vase of red flowers to go along with the red and black lady bug theme. I had red plates and cups and black utensils and napkins. I had a red and black balloon. I made a banner using black yarn and small clothes pins with pictures of her each month of her first year. The birthday girl was also wearing a cute little lady bug shirt. I had a lady bug costume, but she wasn't feeling well that day so I didn't want to put her in anything uncomfortable.

The Food:
I served these adorable ladybug cracker appetizers. I made this delicious Southwest pasta salad and had some bread to go along with it. I had a tray of strawberries with a dip which is made out of a 8 ounce container of strawberry cream cheese and 8 oz of marshmallow cream. For dessert we had cupcakes. I used a yellow cake mix and added zest from one lemon to it and then I frosted it with this lemon frosting. I made lady bug toppers to put on top using the same lady bug image I used on my invites. I printed twelve of the images to a page and printed them and cut them out in a circle shape. I then cut red card stock in a slightly larger circle and glued the ladybug cutout to the red piece. I then taped a toothpick to the back and stuck in the cupcake. They turned out really cute and were delicious. We served with some delicious Breyer's vanilla ice cream.
Thursday, March 3, 2011
How to make a no-sew tutu
Every little girl needs a tutu, right? I've seen so many adorable pictures of baby girls in tutus that I just had to make one so I could snap my own photos of my little one. She has big blue eyes, so I decided to go with a periwinkle tulle. This was super easy and inexpensive to make. These would be great baby shower or birthday gifts, too.
Here's what you'll need to make your own tutu.
-Tulle (I ordered mine here at fabric.com), amount will vary depending on how the size of your child. I ordered two spools (6"x25 yard spool) and I used one and a half spools for my baby.
-1/2" elastic band (I bought a package a Wal-Mart)
-Staple or safety pin
-Scissors
Instructions:
-Measure your child's waist and then deduct about and inch and this will be how big you want the waist
-Staple or safety pin the elastic ends together. I left a little extra elastic overlap so my daughter can continue to grow with this tutu.
-Decided how long you want the tutu and then cut your tulle to twice desired length (since you will be folding in half and tying to the elastic). My tulle on the spool already came with a 6" width but if you don't buy yours by the spool cut into 6" strips first.
-Double knot you tulle pieces to the elastic. This is the most time consuming part. It takes about an hour, but isn't hard. It is a great activity to do while watching tv.
That's it. Once your tutu is as fluffy as you'd like, put it on your little one and snap some pictures!
Tuesday, February 8, 2011
Classic Kids Books (3-8 years)
The last couple of times we have gone to the library we haven't really found any fabulous books in the children's section. I usually request books but haven't been very good at doing that lately. I decided to look online for suggestions on classic children's books to request and I found this site that has great selections. You may want to check out some of these classics you may not have read before.
Tuesday, January 25, 2011
Preschool: The Letter F
I haven't been very good about having preschool time this month with my son. We have been working on the letter F all month. I didn't take pictures, so this is kind of a boring post but we really enjoyed the books on this list.
Books:
-Firetrucks by Peter Brady
-This is the Firefighter by Laura Godwin
-If I could Drive a Firetruck! by Michael Teitelbaum
-Flower Garden by Eve Bunting
-From Seed to Plant by Gail Gibbons
-Apples by Gail Gibbons
-Apple, Apples Everywhere! by Robing Koontz
-Eating the Alphabet by Lois Ehlert
-Fish is Fish by Leo Lionni
-Fish Wish by Bob Barner
-The Rainbow Fish by Marcus Pfister
-Gone Fishing by Earlene Long
-A Fish in His Pocket by Denys Cazet
-How a Tadpole Grows into a Frog
-The Frog in the Pond by Wil Mara
-Watch me grow Frog by Lisa Magloff
-One Frog Sang by Shirley Parenteau
Firetruck day: Read This is the Firefighter by Laura Godwin, Firetrucks by Peter Brady and If I could Drive a Firetruck! by Michael Teitelbaum. I also checked out a couple of movies about firetrucks at the library. Take a field trip to visit the local fire station.
Fish day: Read Fish is Fish by Leo Lionni, A Fish in His Pockent by Denys Cazet, The Rainbow Fish by Marcus Pfister, Fish Wish by Bob Barner, and Gone Fishing by Earlene Long. We made a fish out of construction paper with a googly eye.
Flower day: Read Flower Garden by Eve Bunting, Sunflower House by Eve Bunting. Take you preschooler to the store to buy their own bouquet of flowers.
Fruit day: Read Apples by Gail Gibbons, From Seed to Plant by Gail Gibbons, Apple, Apples Everywhere! by Robing Koontz, and Eating the Alphabet by Lois Ehlert. Have a variety of fruit for your child to sample.
Frog day: Read How a Tadpole Grows into a Frog, The Frog in the Pond by Wil Mara, Watch me grow Frog by Lisa Magloff, and One Frog Sang by Shirley Parenteau. Frog Activities here.
Books:
-Firetrucks by Peter Brady
-This is the Firefighter by Laura Godwin
-If I could Drive a Firetruck! by Michael Teitelbaum
-Flower Garden by Eve Bunting
-From Seed to Plant by Gail Gibbons
-Apples by Gail Gibbons
-Apple, Apples Everywhere! by Robing Koontz
-Eating the Alphabet by Lois Ehlert
-Fish is Fish by Leo Lionni
-Fish Wish by Bob Barner
-The Rainbow Fish by Marcus Pfister
-Gone Fishing by Earlene Long
-A Fish in His Pocket by Denys Cazet
-How a Tadpole Grows into a Frog
-The Frog in the Pond by Wil Mara
-Watch me grow Frog by Lisa Magloff
-One Frog Sang by Shirley Parenteau
Firetruck day: Read This is the Firefighter by Laura Godwin, Firetrucks by Peter Brady and If I could Drive a Firetruck! by Michael Teitelbaum. I also checked out a couple of movies about firetrucks at the library. Take a field trip to visit the local fire station.
Fish day: Read Fish is Fish by Leo Lionni, A Fish in His Pockent by Denys Cazet, The Rainbow Fish by Marcus Pfister, Fish Wish by Bob Barner, and Gone Fishing by Earlene Long. We made a fish out of construction paper with a googly eye.
Flower day: Read Flower Garden by Eve Bunting, Sunflower House by Eve Bunting. Take you preschooler to the store to buy their own bouquet of flowers.
Fruit day: Read Apples by Gail Gibbons, From Seed to Plant by Gail Gibbons, Apple, Apples Everywhere! by Robing Koontz, and Eating the Alphabet by Lois Ehlert. Have a variety of fruit for your child to sample.
Frog day: Read How a Tadpole Grows into a Frog, The Frog in the Pond by Wil Mara, Watch me grow Frog by Lisa Magloff, and One Frog Sang by Shirley Parenteau. Frog Activities here.
Tuesday, January 11, 2011
Interesting article on mothering styles
Here is an interesting article that was in the Wall Street Journal comparing Chinese mothers to Western mothers and why the author thinks the Chinese mothering style is superior. Both my husband and I found ourselves taking both sides while reading, but I found it insightful and it gave me something to ponder. Whether you agree or not, it is an interesting read.
A excerpt:
"A lot of people wonder how Chinese parents raise such stereotypically successful kids. They wonder what these parents do to produce so many math whizzes and music prodigies, what it's like inside the family, and whether they could do it too. Well, I can tell them, because I've done it. Here are some things my daughters, Sophia and Louisa, were never allowed to do:
A excerpt:
"A lot of people wonder how Chinese parents raise such stereotypically successful kids. They wonder what these parents do to produce so many math whizzes and music prodigies, what it's like inside the family, and whether they could do it too. Well, I can tell them, because I've done it. Here are some things my daughters, Sophia and Louisa, were never allowed to do:
• attend a sleepover
• have a playdate
• be in a school play
• complain about not being in a school play
• watch TV or play computer games
• choose their own extracurricular activities
• get any grade less than an A
• not be the No. 1 student in every subject except gym and drama
• play any instrument other than the piano or violin
• not play the piano or violin."
Read the rest of the article here.
Wednesday, December 8, 2010
Handmade Crocheted Items - great Christmas gift
My friend Heidi just started a business selling crocheted hats, flowers, scarfs, and booties. Below is a picture of some of her work. She is taking orders until the 18th of this month. These make wonderful gifts for babies and toddlers on your gift giving list. Check out her blog for more info.

Wednesday, December 1, 2010
Personalized video message from Santa to your child
My friend Nicole let me know about this awesome site that customizes a video message to your child from Santa. You just need to upload a picture or two of your child and answer a few questions and within five minutes you will have a video for your child from Santa. My son loved it!
Thursday, October 28, 2010
How to Make Felt (Flannel) Figures for Your Felt Board
After making my felt board, my next project was to make felt figure kits to use on the felt board. My son is really into the alphabet right now, so I decided to make some uppercase and lowercase letters for us to do during his daily learning time. I just typed the alphabet in Arial font size 175 and printed on T-Shirt Iron-on Transfer paper.
Here's what you'll need:
-T-Shirt Iron-on Transfer Paper - This can be expensive if you don't buy in bulk. You can purchase a pack of six 8"x11.5" sheets at Wal-Mart for about $7.50 ($1.25 each). I bought 100 sheets for $63 (including tax and shipping) from Dharma Trading which works out to 63 cents each. It still is an investment but much cheaper than purchasing your own felt kits which are usually about $10 per kit (which is usually only a sheet or two of figures).
-Felt or flannel (I prefer white)
-Printer (Recommendation: Kodak printers have the best price on cartridges. I know when I had a Cannon it was about $50 to refill my cartridges! Now it is $25 with my Kodak.)
-Iron
-Scissors
-Folders to organize kits
Follow steps on photos below:

If you are interested in scripture stories for your flannel board, I found a great site called Chocolate on My Cranium that has about 50 free kits (see example below) you can download that come with the images and a text document. I put the figures on felt from an idea from a little of this, a little of that blog. These kits are perfect for Family Home Evening (family time we try do every Monday night).
Friday, October 22, 2010
All-Natural Fruit Snack

My son isn't a huge fan of fruit, which doesn't make sense to me because he loves vegetables. I discovered Stretch Island Real-Fruit Strips at my local grocery store last year and my son loves them (and so do I). Each strip counts as a 1/2 serving of fruit. The only problem was they are a bit pricey (33 cents each or more) at the grocery store and my son would eat five each day if I'd let him. So you can imagine how happy I was to discover that Costco now sells them and they are only 12 cents each. I wrote them a letter requesting them a couple months ago and I am not sure if that is why they now have them or not, but I am so happy they have them. So next time you visit Costco (or your grocery store) try them out. They are delicious and good for you!
Wednesday, October 13, 2010
How to make a flannel board (aka felt board)
Supplies needed:
-Framed white board (mine is also magnetic) - I bought mine at Wal-Mart for $6
-Felt or Flannel one inch larger than the board - I had this on hand but should only be a couple dollars
-Butter knife
Then follow the pictures and instructions below.
When you are finished, you'll have a felt board on one side and a white board and magnet board on the other.
Wednesday, September 15, 2010
How to Make a Headband Organizer
I needed something to organize all of my daughter's headbands so I don't leave them all over the place. This is an inexpensive, simple way to organize your girls or your own headbands.First, you will need the following supplies:
- Oatmeal canister (42 oz)
- Fabric (10"x18" - the 18" gives you a couple inches of overlap)
- Spray adhesive
- Two 16" pieces of ribbon
- Hot glue
Wipe out the canister, so it is nice and clean inside for storing other hair ribbon, headbands, etc. Then following the directions on the pictures below.
That's it. Then you have your finished product! You could even spray paint the lid, if the white doesn't match your fabric. You can also store things inside the canister if you run out of room on the outside.
Monday, September 6, 2010
Hair bow and hair clips organizer frame

Since having a baby girl I have found I keep finding new bows and ribbons to put in her hair and I have been in need of a place to put them and keep them organized. I decided to make an organizer for her bows, clips, and headbands (I will be doing a headband organizer post soon) and one for a friend. This is a simple, inexpensive, and decorative way to organize your hair clips and bow.
Supplies Needed:
Frame
Fabric or scrapbook paper
Ribbons
Spray Paint (if you are painting over old frame)
Spray Adhesive
Hot glue

I used fabric I had left from the rag quilt. The colors will go with her room when she gets one someday. That way I can hang it in her room, but you could also pick something to go with your bathroom decor if that is where you will be hanging the frame.
Instructions:
Follow the pictures below. They should be pretty self-explanatory.

It took about six coats to get these the desired color. It took about three hours for them to be ready to handle.


Subscribe to:
Posts (Atom)