Showing posts with label Craft Projects. Show all posts

Friday, February 8, 2013

Make your own magnet board

This is a simple project that you can do in an hour.   Supplies needed:

Large frame (look at a thrift store)
Piece of sheet metal (Home Depot)
Tin snips
Spray paint (and spray primer if the frame is metal or you are changing to a drastically different color)
Magnets/Magnetic organizers (optional)

I wanted a magnet board for my office to hang my calendar and paper work I wanted off my desk.  I went to good will and found a large picture for around $20 and I simply painted the frame and purchased a large piece of sheet metal at Home Depot (in the plumbing section - the sheet metal is about twice the size of the board you see here, so you can get two boards out of one piece!  The metal was around $15).  I used tin snips to cut it to the right size.  I found a magnetic cup holder and file holder at Target to hold my pens and my papers)


I just made another one for my daughter's room to display her artwork and I also am going to hang some cute printable quotes on it.  This is a fun and easy way to keep organized!

Friday, February 1, 2013

Minnie Mouse Party

My daughter loves Minnie Mouse, so we had a small party with my parents on her birthday to celebrate.  My mom is an excellent cake decorator, so she helped me out.  She had this  Mickey Mouse cake pan where he is wearing a party hat.  To make it look like Minnie, we cut off his party hat and made it look like a bow and then we just looked at a picture of Minnie Mouse when we frosted it. You could also always piece the cake together by backing two 9x12 cakes and cutting out with a pattern you draw or find online.  We also did pink and white cupcakes.  


Frosting Recipe:
4 cups powdered sugar
1 cup softened butter
1 tsp vanilla


We made a cute birthday banner using sparkly pink and black paper and placing stickers on each pennant, spelling out "Happy Birthday."  We punched holes in the pennants and strung with Minnie Mouse ribbon.  In between the pennants we placed pictures of my daughter and hung with small cloths pins. 

Wednesday, January 30, 2013

No sew valance


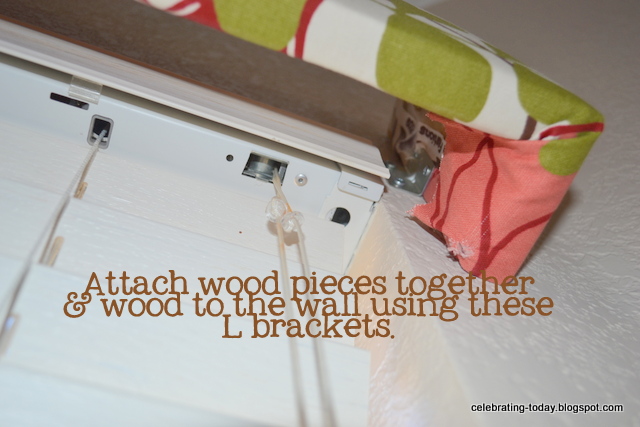
I wanted an easy valance idea for my bay window in my kitchen.  I cut a piece of wood slightly longer than the width of my window and then cut two pieces a couple of inches  long to connect to my the long piece.  I connect them using an L bracket.  I then wrapped the valance frame in batting.  I glued it down, because I didn't have a staple gun at the time.  If you have a staple gun, I would use that.  I then took my fabric and did the same thing.  Pulled it tight around the valance frame and glued (or staple).  I then connected the valance to the wall with an L bracket.  It is a two person process hanging them on the wall, but it goes fairly quickly.  That's it!  An easy no-sew box valance! 


Monday, January 28, 2013

How to Make Your Own Soap


My son is a lego-maniac, so naturally this past year he wanted to lego party.  I found this cool lego mold (they even have the lego figure molds).  I used the mold to make chocolates to go on top of the cupcakes, which unfortunately melted in the summer heat.  So keep the chocolate cool if you are going to be having an outdoor party in the heat! 
 
 I decided to make lego soap as a party favor because I had a big block of glycerin soap to use and I had the lego mold.  


Making the soap is easy.  You simply cut off a piece of soap from the block and slowly melt in the microwave.  Stirring after one minute and then about every 30 seconds or so.  You can then add soap dye to color the soap and then add a fragrance oil if you so desire.  You mix the dye and fragrance in the melted soap and then pour into your mold and let set.  That's it!  Super easy and a fun party favor or gift for a friend! Below you can see the lego soap we handed out to his friends. 

Wednesday, January 23, 2013

Family Photos Wall Collage Display

I have never had a family picture hanging in our home and it was my goal this past year to get one.  I ended up with several.  I decided to print my photos in a 12"x12" size at Costco.  To break up the photos I also created the words, "Live," "Love," and "Laugh" on my design program and printed those out as 12"x12" photos also.  I then purchased 12"x12" frames at JoAnn.  I love the look of canvas prints, but they were too pricey and I can switch the pictures around with frames.  I also ordered vinyl on etsy that said, "Together is a wonderful place to be" and placed it above my frames which I displayed in three rows of three.  It is a fun way to display our family photos. 

Thursday, November 8, 2012

How to Make a Thankful Tree


I know I've pretty much been on a blogging sabbatical for the past couple of years!  Buying a fixer upper has created way too many projects for me; however, that does mean I have a lot of fun projects to blog about when I find the time.  My goal is to start blogging once a week (probably Thursdays or Fridays). 

I am a big fan of family traditions, especially for the holidays.  My kids are young and I want to start traditions now that they can look forward to each year.  Fall is a time I look forward to each year.  Probably like you, our October was jam packed with costume parties, candy, pumpkin goodies, and trips to the pumpkin patch and apple orchard.  I must say I breathed a huge sigh of relief when November 1st rolled around!  Once Halloween passes it seems the anticipation of Christmas begins and we often don't give much thought to Thanksgiving (except for the food on the actual day).  November is a nice month to kick back a bit before the craziness of December begins and reflect on our many blessings.  To help my kids with this I thought it would be fun to create a Thankful Tree.  I have seen this idea floating around the blogosphere and I thought it was the perfect November tradition for our family.

Creating a Thankful Tree is simple and makes a fun decoration or centerpiece.  I went out to my backyard and snapped a few branches off one of my trees and placed them in a large Kerr Jar.  I then cut circles out of scrapbook paper and hole punched them.  You then can write what you are thankful for on the back of each circle tag and place on a branch.  You can do one circle per person each day or you could wait until the day of Thanksgiving and have each person at your dinner write what they are thankful for and place the tag on the tree.

Happy November!


"There are two little words in the English language that perhaps mean more than all others.  They are 'thank you.'"
- Gordon B. Hinckley from his book Way to Be!
Posted by Picasa

Wednesday, August 17, 2011

Busy Bags


My friend had the wonderful idea recently of having a busy bag swap. A busy bag is an activity for young children that teaches them a skill as well as keeps them busy whenever you may need them to be. Whether it is at church, on a car ride, or just at home. Rather than have them watch yet another tv show, you can give them a great learning activity instead.

We had a group of 14 women. We each made 14 of the same busy bag activity and then we got together and swapped them. So we each came home with 14 different activities for our children. My son has tried several of them already and loves them. I am hoping we will do another one soon since they were such a hit.

Here are some links with ideas for busy bags.
Button Snake (this is what I did for my bag)
List of ideas here, here, or here.

Monday, June 20, 2011

Necklace and Braclet Jewelry Organizer Board


After we were first married I bought a really nice jewelry box like my mom had. Growing up I loved her jewelry box and I was excited to have my own. It is a beautiful box, but it just hasn't worked organized my necklaces well. I never can seem to find the one I am looking for and they often get tangled and I have a hard time shutting the doors because the box is overflowing. It basically was a big mess. I have really been into organizing since moving into our new place, so one of my projects this past week was to find a new jewelry solution. I purchased a $6 cork board at Wal-Mart and hung it on my closet wall and put push pins on the board and put my necklaces and bracelets on them. Done. Nothing fancy, but it works great. I can see all of my necklaces easily and they don't get tangled. They are hanging in my closet right by my clothing so I can put on my jewelry immediately after getting dressed. I love it. If you wanted to dress it up a bit you could cover the cork board with some cute fabric, using the method I used for my flannel board here.

Thursday, October 28, 2010

How to Make Felt (Flannel) Figures for Your Felt Board


After making my felt board, my next project was to make felt figure kits to use on the felt board. My son is really into the alphabet right now, so I decided to make some uppercase and lowercase letters for us to do during his daily learning time. I just typed the alphabet in Arial font size 175 and printed on T-Shirt Iron-on Transfer paper.

Here's what you'll need:

-T-Shirt Iron-on Transfer Paper - This can be expensive if you don't buy in bulk. You can purchase a pack of six 8"x11.5" sheets at Wal-Mart for about $7.50 ($1.25 each). I bought 100 sheets for $63 (including tax and shipping) from Dharma Trading which works out to 63 cents each. It still is an investment but much cheaper than purchasing your own felt kits which are usually about $10 per kit (which is usually only a sheet or two of figures).
-Felt or flannel (I prefer white)
-Printer (Recommendation: Kodak printers have the best price on cartridges. I know when I had a Cannon it was about $50 to refill my cartridges! Now it is $25 with my Kodak.)
-Iron
-Scissors
-Folders to organize kits

Follow steps on photos below:

You can find the mirror image option (see below) in by selecting File, Print, Properties, Layout tab.


If you are interested in scripture stories for your flannel board, I found a great site called Chocolate on My Cranium that has about 50 free kits (see example below) you can download that come with the images and a text document. I put the figures on felt from an idea from a little of this, a little of that blog. These kits are perfect for Family Home Evening (family time we try do every Monday night).

Wednesday, October 13, 2010

How to make a flannel board (aka felt board)

I am working on preparing a library of supplies and materials to teach my children. I am currently working on making kits for my flannel board. I will post more on that soon. Today, I want to show you how I ended up creating my felt board.

Supplies needed:
-Framed white board (mine is also magnetic) - I bought mine at Wal-Mart for $6
-Felt or Flannel one inch larger than the board - I had this on hand but should only be a couple dollars
-Butter knife

Then follow the pictures and instructions below.


When you are finished, you'll have a felt board on one side and a white board and magnet board on the other.

Saturday, September 25, 2010

How to make a hanging kitchen towel using a pot holder


I like having a hanging kitchen towel that attaches to the oven handle to wipe my hands on after I wash them. Regular towels always slide or fall, so I like these hanging towels. Mine were six years old and in sad, sad shape so I finally got around to making some. I bought the pack of towels at Target of $2 each and the hot pads at the dollar store, so if you have buttons and thread on hand these are only $2.50 each to make. These make great wedding gifts or even a gift for a friend. The instructions are pictured below.


I found it easier to baste by hand and gather rather than use the machine.

Wednesday, September 15, 2010

How to Make a Headband Organizer

I needed something to organize all of my daughter's headbands so I don't leave them all over the place. This is an inexpensive, simple way to organize your girls or your own headbands.

First, you will need the following supplies:
  • Oatmeal canister (42 oz)
  • Fabric (10"x18" - the 18" gives you a couple inches of overlap)
  • Spray adhesive
  • Two 16" pieces of ribbon
  • Hot glue
Wipe out the canister, so it is nice and clean inside for storing other hair ribbon, headbands, etc. Then following the directions on the pictures below.


That's it. Then you have your finished product! You could even spray paint the lid, if the white doesn't match your fabric. You can also store things inside the canister if you run out of room on the outside.

Monday, September 6, 2010

Hair bow and hair clips organizer frame


Since having a baby girl I have found I keep finding new bows and ribbons to put in her hair and I have been in need of a place to put them and keep them organized. I decided to make an organizer for her bows, clips, and headbands (I will be doing a headband organizer post soon) and one for a friend. This is a simple, inexpensive, and decorative way to organize your hair clips and bow.

Supplies Needed:
Frame
Fabric or scrapbook paper
Ribbons
Spray Paint (if you are painting over old frame)
Spray Adhesive
Hot glue

I used fabric I had left from the rag quilt. The colors will go with her room when she gets one someday. That way I can hang it in her room, but you could also pick something to go with your bathroom decor if that is where you will be hanging the frame.

Instructions:
Follow the pictures below. They should be pretty self-explanatory.


It took about six coats to get these the desired color. It took about three hours for them to be ready to handle.


The finished results...